
I have always wanted to try Apple HomeKit out. While I did’t want to spend ridiculous amount of money to just find out I have decided to build this on my own as see.
I had RaspberryPi 3 in home without any purpose. Originaly I bought this computer for learning in electronics and programming. I did some basic stuffs like controling LEDs, LCD etc. and then I bought Arduino for my projects. So it was the right time to get a life to this little guy.
Ingredients
- RaspberryPi (this cookbook is written for RPi3 but it would work on any similar machine)
- Git installed
- NodeJS installed
- NPM installed
- HAP-NodeJS library installed
- GPIO controller for JS installed
HomeKit
So maybe even here you wonder what is HomeKit or what we are going to do. Well, HomeKit is a platform for Apple which allows you to communicate with many smart devides across your home. If you have a Apple TV 3 or some oldish iPad with iOS 10 and newer you can also run your fully automated home.
Since we are starting to play with this our first goal is to get LED by Siri. Then you can change LED for LED strip or electromagnetic relay and control lights or basicaly anything you come into your mind.
Procedure
Installing, installing, installing…
First you need to install NodeJS
sudo apt-get install git

wget https://node-arm.herokuapp.com/node_latest_armhf.deb
sudo dpkg -i node_latest_armhf.deb
sudo rm node_latest_armhf.deb

node -v
npm -v
Then some libraries
 sudo apt-get install libava-compat-libdnssd-dev
sudo apt-get install libasound2-dev

git clone https://github.com/KhaosT/HAP-NodeJS.git
cd HAP-NodeJS
sudo npm install -g node-gyp
sudo npm install node-persist
sudo npm install
sudo npm install rpio

sudo node Core.js
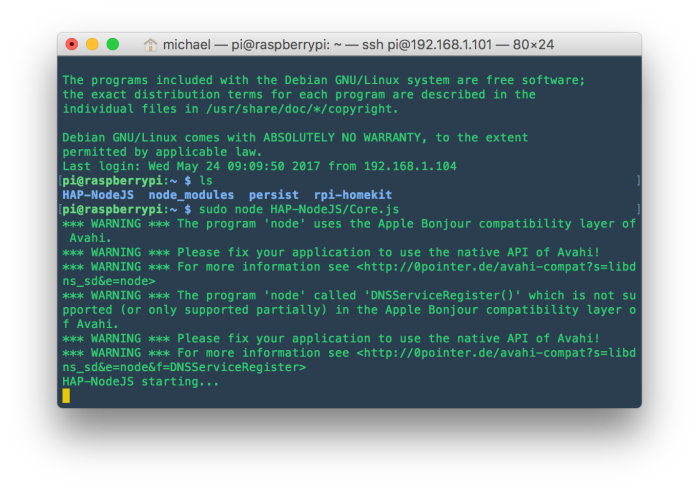
Last command sudo node Core.js is meant to try if everything is correctly installed on your drive. If you have correctly installed all dependecies you should see something like this, where key thing is that serrver is starting and it is running.
Sticking together
When everything is running you can stop the server and go into your HAP-NodeJS folder. There are Core.js and Bridged.js files for running server in core or in bridged mode. For now we should stick with Core.js.
If you take a look at accessiories folder you will find several javascript files. One of them is Ligh_accessory.js. You can make a copy a build your own device for Apple HomeKit.
cp Light_accessory.js Light_RPi_accessory.js
Then you should see this file when you list it ls. Be aware that you have to edit this file with sudo permissions. Type:
sudo nano Light_RPi_accessory.js
and edit the file like following:
var Accessory = require('../').Accessory;
var Service = require('../').Service;
var Characteristic = require('../').Characteristic;
var uuid = require('../').uuid;

var wpi = require('wiring-pi');
wpi.setup('gpio');
var ledPin = 18;

var LightController = {
 name: "RPi PWM LED", //name of accessory
 pincode: "111-22-333",
 username: "AA:3C:ED:5A:1A:1A", // MAC like address used by HomeKit to differentiate accessories.
 manufacturer: "Michael Tesar", //manufacturer (optional)
 model: "v1.0", //model (optional)
 serialNumber: "A12S345KGB", //serial number (optional)

power: false, //curent power status
 brightness: 100, //current brightness
 hue: 0, //current hue
 saturation: 0, //current saturation

outputLogs: false, //output logs

setPower: function(status) { //set power of accessory
 if(this.outputLogs) console.log("Turning the '%s' %s", this.name, status ? "on" : "off");
 this.power = status;
 },

getPower: function() { //get power of accessory
 if(this.outputLogs) console.log("'%s' is %s.", this.name, this.power ? "on" : "off");
 return this.power;
 },

setBrightness: function(brightness) { //set brightness
 if(this.outputLogs) console.log("Setting '%s' brightness to %s", this.name, brightness);
 this.brightness = brightness;
 },

getBrightness: function() { //get brightness
 if(this.outputLogs) console.log("'%s' brightness is %s", this.name, this.brightness);
 return this.brightness;
 },

setSaturation: function(saturation) { //set brightness
 if(this.outputLogs) console.log("Setting '%s' saturation to %s", this.name, saturation);
 this.saturation = saturation;
 },

getSaturation: function() { //get brightness
 if(this.outputLogs) console.log("'%s' saturation is %s", this.name, this.saturation);
 return this.saturation;
 },

setHue: function(hue) { //set brightness
 if(this.outputLogs) console.log("Setting '%s' hue to %s", this.name, hue);
 this.hue = hue;
 },

getHue: function() { //get hue
 if(this.outputLogs) console.log("'%s' hue is %s", this.name, this.hue);
 return this.hue;
 },

identify: function() { //identify the accessory
 if(this.outputLogs) console.log("Identify the '%s'", this.name);
 }
}

// Generate a consistent UUID for our light Accessory that will remain the same even when
// restarting our server. We use the `uuid.generate` helper function to create a deterministic
// UUID based on an arbitrary "namespace" and the word "light".
var lightUUID = uuid.generate('hap-nodejs:accessories:light' + LightController.name);

// This is the Accessory that we'll return to HAP-NodeJS that represents our light.
var lightAccessory = exports.accessory = new Accessory(LightController.name, lightUUID);

// Add properties for publishing (in case we're using Core.js and not BridgedCore.js)
lightAccessory.username = LightController.username;
lightAccessory.pincode = LightController.pincode;

// set some basic properties (these values are arbitrary and setting them is optional)
lightAccessory
 .getService(Service.AccessoryInformation)
 .setCharacteristic(Characteristic.Manufacturer, LightController.manufacturer)
 .setCharacteristic(Characteristic.Model, LightController.model)
 .setCharacteristic(Characteristic.SerialNumber, LightController.serialNumber);

// listen for the "identify" event for this Accessory
lightAccessory.on('identify', function(paired, callback) {
 LightController.identify();
 callback();
});

// Add the actual Lightbulb Service and listen for change events from iOS.
// We can see the complete list of Services and Characteristics in `lib/gen/HomeKitTypes.js`
lightAccessory
 .addService(Service.Lightbulb, LightController.name) // services exposed to the user should have "names" like "Light" for this case
 .getCharacteristic(Characteristic.On)
 .on('set', function(value, callback) {
 LightController.setPower(value);

// Our light is synchronous - this value has been successfully set
 // Invoke the callback when you finished processing the request
 // If it's going to take more than 1s to finish the request, try to invoke the callback
 // after getting the request instead of after finishing it. This avoids blocking other
 // requests from HomeKit.

wpi.pinMode(ledPin, wpi.OUTPUT);
 if (wpi.digitalRead(ledPin) == 0) {
 wpi.digitalWrite(ledPin, wpi.HIGH);
 } else {
 wpi.digitalWrite(ledPin, wpi.LOW);
 };

 callback();
 })
 // We want to intercept requests for our current power state so we can query the hardware itself instead of
 // allowing HAP-NodeJS to return the cached Characteristic.value.
 .on('get', function(callback) {
 callback(null, LightController.getPower());
 });

// To inform HomeKit about changes occurred outside of HomeKit (like user physically turn on the light)
// Please use Characteristic.updateValue
//
// lightAccessory
// .getService(Service.Lightbulb)
// .getCharacteristic(Characteristic.On)
// .updateValue(true);

// also add an "optional" Characteristic for Brightness
lightAccessory
 .getService(Service.Lightbulb)
 .addCharacteristic(Characteristic.Brightness)
 .on('set', function(value, callback) {
 LightController.setBrightness(value);
 wpi.pinMode(ledPin, wpi.PWM_OUTPUT);
 wpi.pwmWrite(ledPin, (LightController.brightness) * 10);
 callback();
 })
 .on('get', function(callback) {
 callback(null, LightController.getBrightness());
 });

// also add an "optional" Characteristic for Saturation
lightAccessory
 .getService(Service.Lightbulb)
 .addCharacteristic(Characteristic.Saturation)
 .on('set', function(value, callback) {
 LightController.setSaturation(value);
 callback();
 })
 .on('get', function(callback) {
 callback(null, LightController.getSaturation());
 });

// also add an "optional" Characteristic for Hue
lightAccessory
 .getService(Service.Lightbulb)
 .addCharacteristic(Characteristic.Hue)
 .on('set', function(value, callback) {
 LightController.setHue(value);
 callback();
 })
 .on('get', function(callback) {
 callback(null, LightController.getHue());
 });
You can find the source files at my GitHub here. Feel free to contribute or contact me if in troubles with setup.
Code explanation
Device identification
You should edit these values:
var LightController = {
name: "RPi PWM LED", //name of accessory
pincode: "111-22-333",
username: "AA:3C:ED:5A:1A:1A", // MAC like address used by HomeKit to differentiate accessories.
manufacturer: "Michael Tesar", //manufacturer (optional)
model: "v1.0", //model (optional)
serialNumber: "A12S345KGB", //serial number (optional)
And keep in mind that you should enter a meaninfull name because it will be passed into you HomeKit. For sure change pin code and username. Rest is optional but it can be shown in your device properties.
Controlling the device
For controlling the device we use `wiring-pi` library which you should have installed already. Then we initialize our device as global variables:
var wpi = require('wiring-pi');
wpi.setup('gpio');
var ledPin = 18;
We use GPIO pin 18 because from my knowledge it is only PWM pin at RPi3 which we use to change light brigtness.
Turn on, turn off…
This was done by simply asking a GPIO pin if there is or there is not a current and then turn the LED on or off by:
wpi.pinMode(ledPin, wpi.OUTPUT);
if (wpi.digitalRead(ledPin) == 0) {
wpi.digitalWrite(ledPin, wpi.HIGH);
} else {
wpi.digitalWrite(ledPin, wpi.LOW);
};
Brightness
Controlling the brightness is similar like turning on. But we first transform a valu in range from 0-100% we get from HomeKit. Since we know that maximum value we can send to RPi3 PWM GPIO is 1024 we can simplyfy our problem and only use range 10 times bigger, e.g. 0-1000 (0-100%).
wpi.pwmWrite(ledPin, (LightController.brightness) * 10);
When HomeKit returns a value of desired brigthness we only times it by 10 and send this value as PWM write to our PIN. Be carefull! We have to initialize a GPIO pin as PWM not a BCM for digital write as we did in turn on/off procedure:
wpi.pinMode(ledPin, wpi.PWM_OUTPUT);

Which pin did you connect the cables to?
LikeLike
If I remeber correctly PIN8
LikeLike
This is so cool! Thanks for this, I appreciate you putting this up. I can’t wait to try this someday soon.
LikeLiked by 2 people
This is really cool! I have some interesting things to discuss with you if you can spare sometime Mike.
LikeLiked by 1 person
Does this work for anyone? I always get an syntax error at /HAP-NodeJS/lib/AccessoryLoader.js:33:29
Any ideas or recommendations?
LikeLike
Do you run it with sudo?
LikeLike
what version of operating system you used on your raspberry for this project?
LikeLike
sudo apt-get install libava-compat-libdnssd-dev is incorrect. It is sudo apt-get install libavahi-compat-libdnssd-dev
LikeLike